Linearising Headphones with the ADI-2 Series
Sennheiser HD650
Let’s start with a very well known and popular headphone, the Sennheiser HD650. It is a true industry reference, so you might wonder why do we need to EQ it? Well, the most often criticized issue is a lack of bass, obviously caused by its open design. Let’s see what other useful information the Oratory1990 measurements have to offer.
SPL Frequency Response without EQ
This graph shows three curves: The pale blue one, labelled Harman target, is the target curve. A frequency response that is preferred by many as ‘good sounding’. Other than one might expect this curve is not linear. When comparing headphones to loudspeakers it turned out that headphones must have a curve like this one to sound similar to loudspeakers. This kind of target curve has become a global standard, although the curve is not always fully identical. Generally speaking, a slight boost in the bass and upper mid/presence area is universally agreed upon as preferable, when listening to headphones.
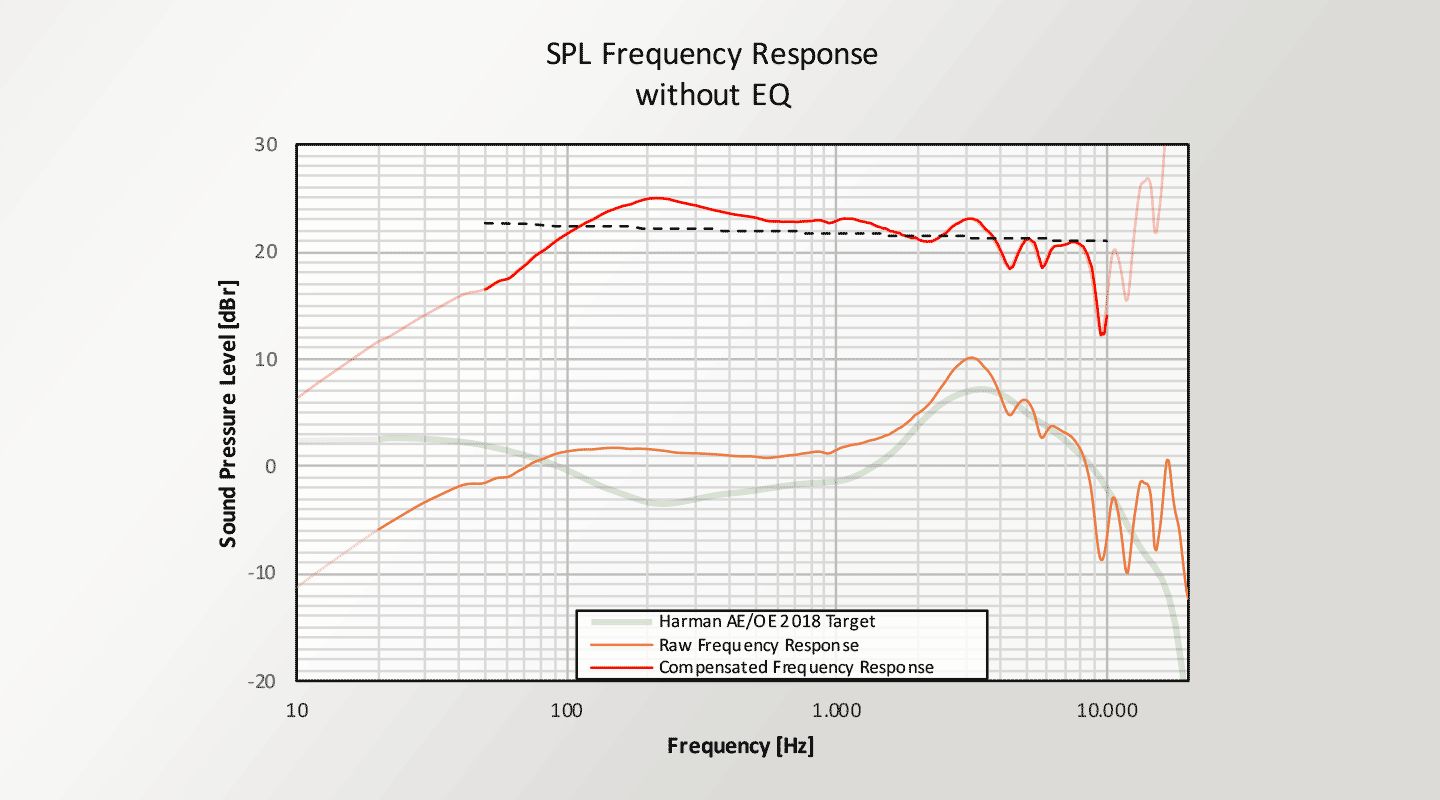
The orange curve is the measured frequency response of the tested headphone - in this case the Sennheiser HD650. The red curve shows the difference between the desired target and the actual result. With the HD650 it is easy to see that upper bass and the lower mids are a bit too high, while lower bass is lacking. All the rest looks quite good. One should also know that above 5 kHz headphone measurements run into issues, so the wiggling in treble can be ignored as long as the average follows the expected curve, and no broad peaks or attenuations occur.
SPL Frequency Response with EQ
The EQ proposed by Oratory will make the HD650 match the harman target curve much better. How much better is shown in this plot. As can be easily seen the measured result is spot-on to the target curve, the difference as shown in the red line is minimal.
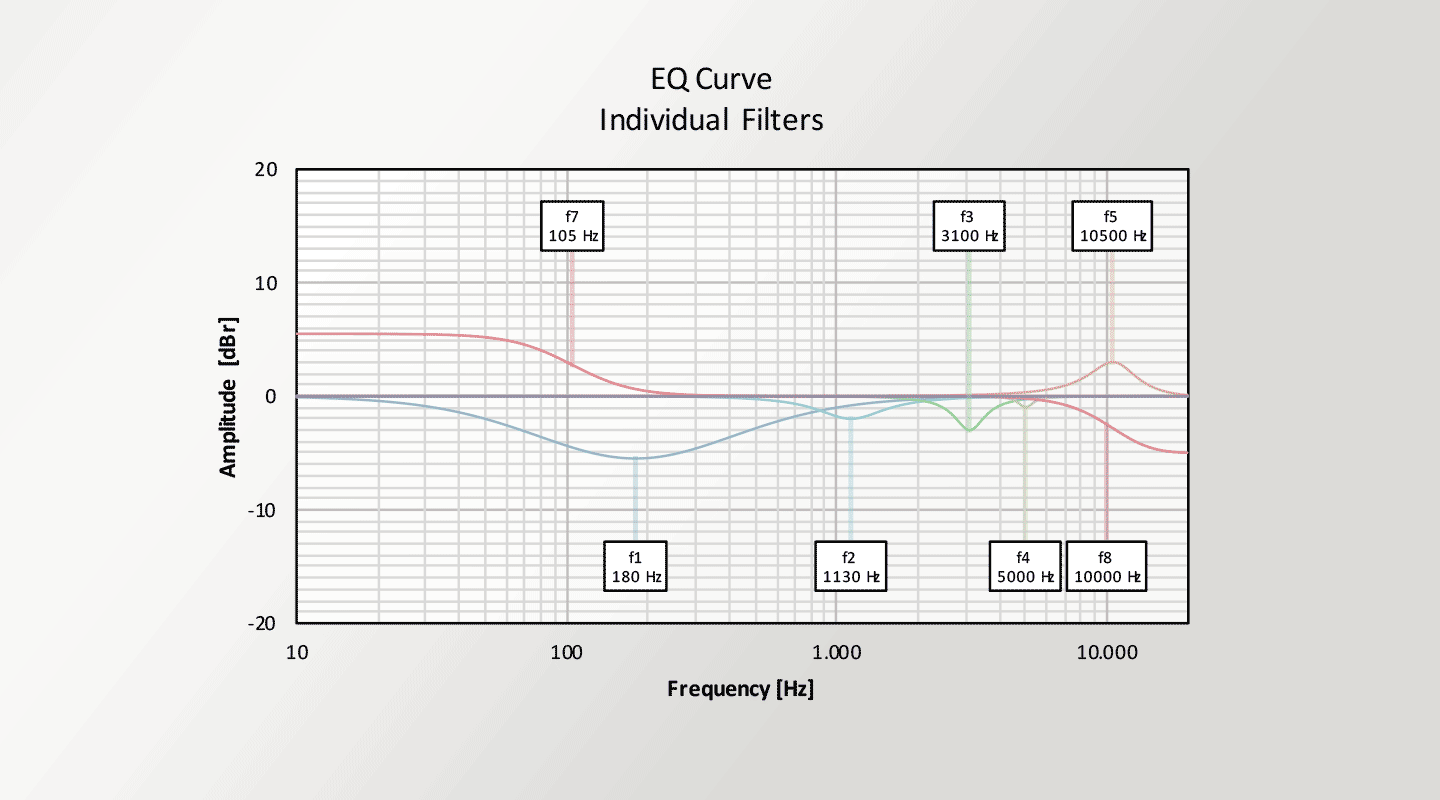
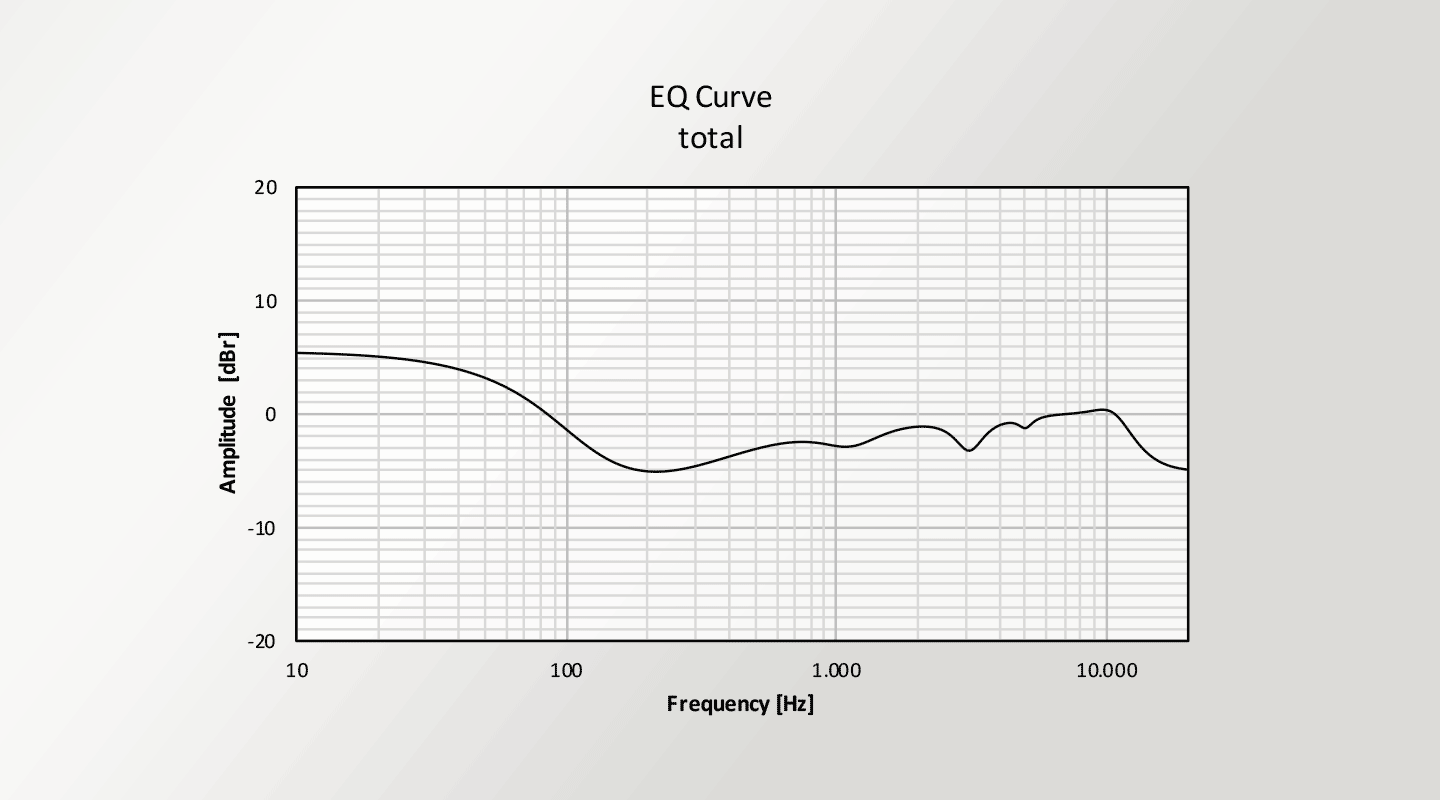
EQ Curve Individual filters
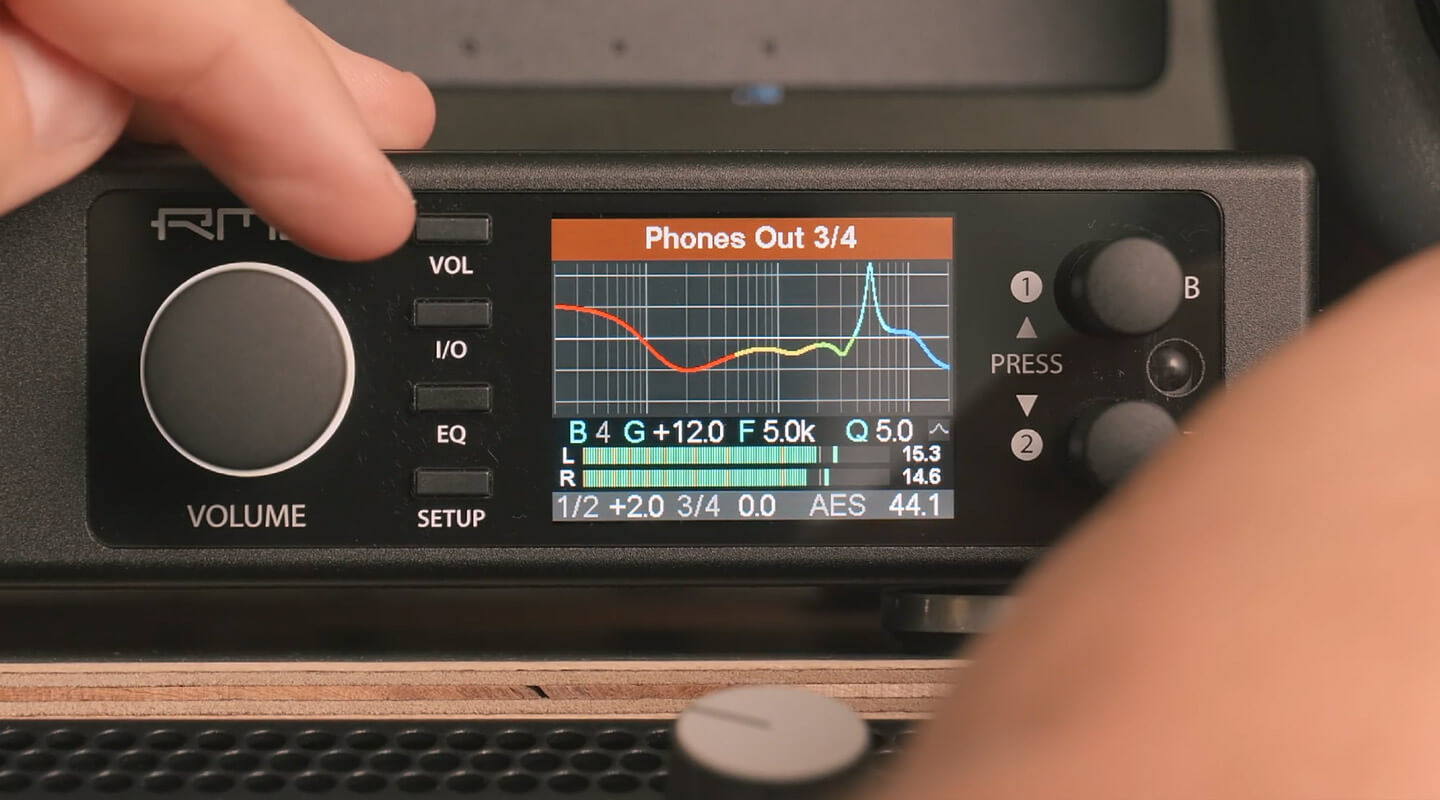
This first pic shows the frequency response of each single filter, the second plot, EQ Curve total, shows all of them active at the same time. This curve can be visually compared to the plot shown on the display of the ADI. Therefore setup errors can be quickly detected.
Filter settings
Now we need to adjust the filter settings which have to programmed into the parametric equalizer of the ADI. Let’s do this step by step. First enter the EQ menu and activate ‘Load B/T with Preset’. This makes the setup more easy as we will use Bass and Treble as additional bands for the PEQ.
- Band 1 is set to Peak mode, Frequency to 180 Hz, Gain to -5.5 dB, Q to 0.4.
Because 0.4 is not available, simply set it to the next value, here 0.5. - BTW, BW can be ignored, it is the same as Q but given as a differently calculated value (BW = Δf = f0 / Q).
- Band 2 is set to Peak mode, Frequency to 1130 Hz, Gain to -2.0 dB, Q to 1.5.
- Band 3 is set to Peak mode, Frequency to 3100 Hz, Gain to -3.0 dB, Q to 3.0.
- Band 4 is set to Peak mode, Frequency to 5000 Hz, Gain to -1.0 dB, Q to 6.0. Use 5.0.
- Band 5 is set to Peak mode, Frequency to 10500 Hz, Gain to 3.0 dB, Q to 1.4.
- Band 7 fixed to Low Shelf. Set Frequency to 105 Hz, Gain to 5.5 dB, Q to 0.7.
- Band 8 is fixed to High Shelf. Set Frequency to 10000 Hz, Gain to -5 dB, Q to 0.7.
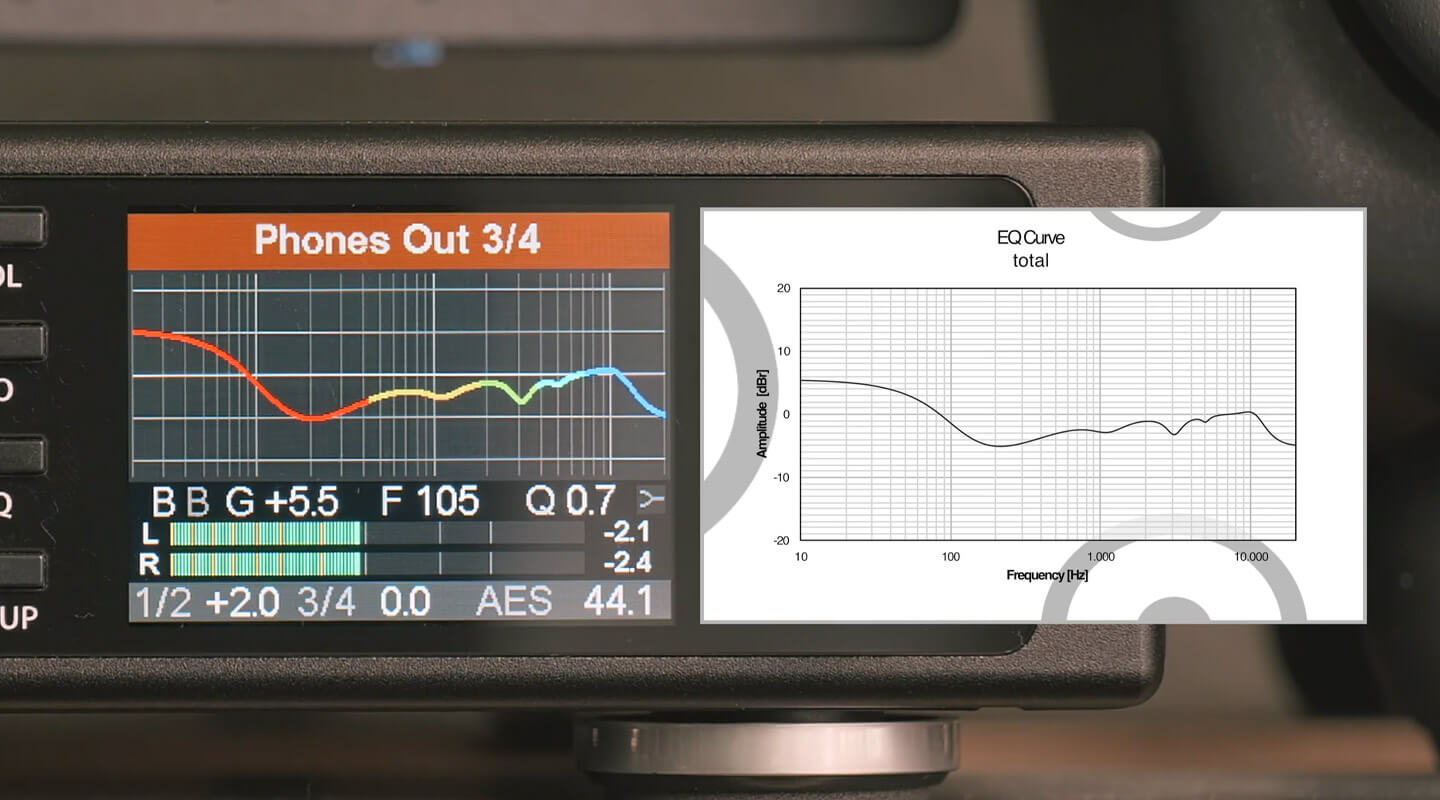
Now compare the plot on the screen with the plot EQ curve total, they should look identical – and they do! If not - the most common error is to have one or more bands in the wrong mode, Peak or Shelf.
Save it!
Now that you dialed in the compensation curve make sure to save the PEQ in one of the 20 memory slots. In the EQ menu push encoder 2 several times until ‘Save to push’ is in focus. Turn encoder 2 to select a free memory slot, then push encoder 2 for one second. After that you might change the name to a more meaningful one.
Quick comparison
The change in sound is very easy to check – either at the unit, but even more easy via the remote control. Simply switch EQ on and off again repeatedly. Note that due to the changes in frequency response there will be a volume change as well. This is unavoidable and can not be 100% compensated. So try to listen to the real sound changes only.
Personal preferences - Bass/Treble as you like
There is a small but important hint in the lower right of the Oratory PDF:
- Adjust gain of band 7 to taste (bass)
- Adjust gain of band 8 to taste (treble)
When it comes to the amount of bass and treble there is no final truth because everyone has a different taste, and with treble also a different hearing depending on age. While Bass and Treble are used to perfectly match the Harman target curve, they can still be used as typical bass and treble controls. Any change will just do that, more or less bass/treble, but not bring tonal deviations or colouring into the sound. The compensation curve and its audible effects stay valid.
Do we really need 7 bands?
As mentioned in the ADI’s manual smaller corrections are often inaudible, so they can be ignored. The ADI has all the tools to compare and check what is really needed – for you. Looking at the filter table there is already one suspicious entry: Band 4 with a mere attenuation of -1 dB, which might already be inaudible, but clearly is inaudible at a Q value of 6. The frequency range affected is extremely small, and then only corrected by one dB – most probably the change by this filter setting can be removed without any change in sound.
Here are two ways to check this:
1. Enter the PEQ settings of band 4 and change the Gain from -1 to 0 dB which effectively disables this filter. But don’t stop there – to make this filter audible dial the Gain up to at least +6 dB until you notice an audible difference. Then do the same in the negative range. You will quickly conclude – this filter is not needed.
2. Save the EQ a second time with band 4 filter set to 0 dB, then switch between these two EQ presets. You can use the Remap Keys function to put the original EQ on remote button 1 and the 0 dB version on button 2.
Alles relativ…
…as we say in German. Band 5 tries to fill up the treble at 10.5 kHz a bit, but at the same time High Shelf is used to attenuate the treble a lot. If you like to use less attenuation the peak of band 5 might not be needed, or not produce any significant audible difference anymore. Again this is easy to check.
The question here is – do we need all the treble linearization at all, or isn’t the Sennheiser already perfectly sounding as it is? In that case we could just use a simple Treble shelf to adjust treble to our taste, and remove filters 3, 4 and 5 completely. Do as you wish and whatever suits your taste – the most important thing in listening to music is that YOU enjoy it!
Beyerdynamic DT880
Our second example is also very popular, the Beyerdynamic DT880, again an open design with some lack in bass, but also known for peaky treble.
SPL Frequency Response without EQ
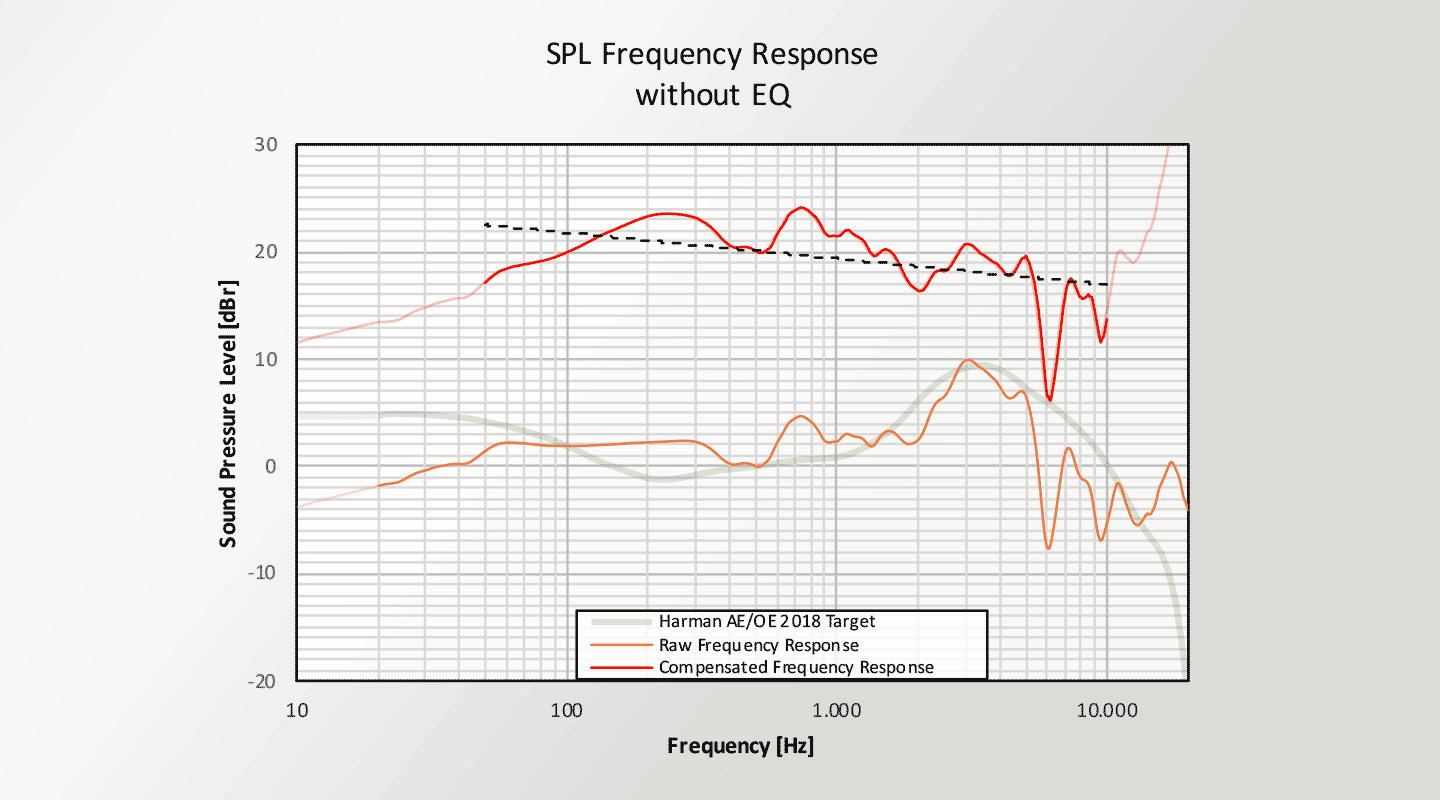
And indeed – the measured frequency response clearly shows the famous beyer peak at around 6 kHz. The rest is quite similar to the HD650. Let’s jump to the filter table and check the settings – there it is, band 5 dials down treble at 5.9 kHz by 7 dB.
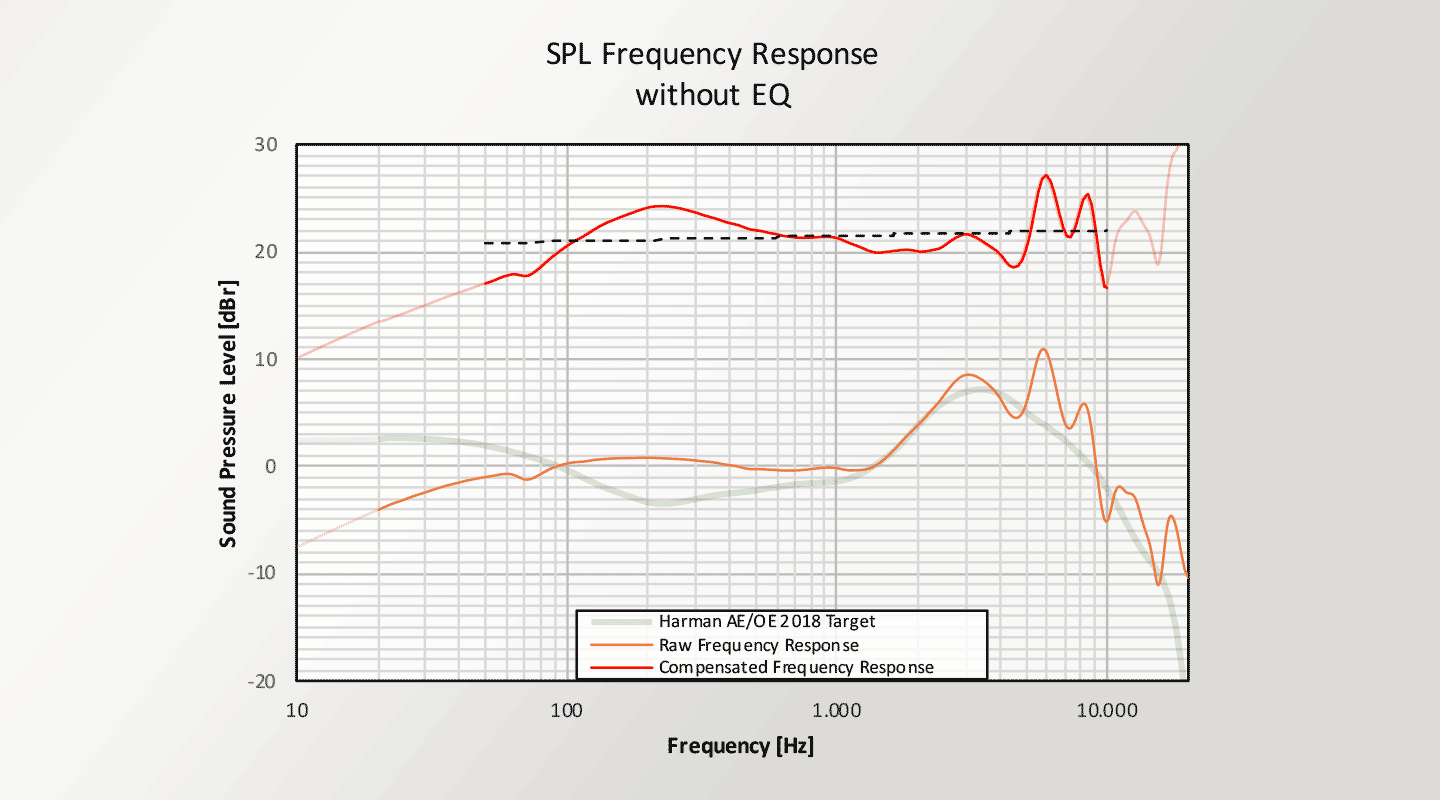
While most of the information that we gave for the HD650 also applies to the DT880, note the extended comments in the lower right of the pdf. As with the Sennheiser 650, band 7 and 8 are used again to match your personal preference in bass and treble - with treble wonderfully described as ‘airiness’, but additionally we see:
- Adjust gain of band 2 to preference (warmth)
- Adjust gain of band 6 to preference (sibilance / sharpness)
The definition of warmth is basically less treble. As everything is relative you also get less treble when you have more bass. But for the most common ‘warmth definition this is higher bass up to lower middle range, which makes vocals and some instruments sound more ‘warm’. Band does exactly that by influencing the area of 260 Hz.
The note on band 6 is a typo, clearly band 5 is meant, which can be used to control the beyer peak, and thus change sibilance of speech and vocals and the overall sharpness of the sound.
HEDD Heddphone
Other than the Sennheiser and beyerdynamic the Heddphone dances around the Harman target curve, always a bit off. To compensate for that several filters are required, and none of the filters has such a small influence that it could easily be removed. You should now be familiar with the plots and information in the pdf, and can easily dial in the suggested EQ settings. Again the paper gives additional information on how to change the sound to your taste.
Alles relativ – schon wieder…
When looking at the curve of the uncorrected frequency response, it is noticeable that the HEDD basically follows the target well. Because of the small deviations the HEDDphone will therefore not sound bad, but 'different', or like having its own sound signature. In fact, in our opinion, it is quite sufficient to boost the upper treble minimally and the very low bass a bit more.
In general, the Harman target curve is not the holy grail of headphone measurements. However, it can help tremendously in improving the sound, as gross errors and deviations can be detected .
It is also not necessary to match the Harman curve 100% accurately. Instead of countless small filters for the most accurate correction possible, we think it is perfectly sufficient to match your own taste with bass and treble - which at the same time corrects weaknesses of the headphone in bass and treble - and to correct the really rough deviations, like the 6 kHz peak of the beyerdynamic.
But whatever you decide - the ADI-2 DAC and Pro give you the tools for efficient sound optimization - easy to use and clearly presented.